News Breaking
Live
wb_sunny

Breaking News

How to set up two computers to share over a LAN in Windows

How to set up two computers to share over a LAN in Windows


Set up two computers for sharing via LAN

Creating a Local Area Network (LAN) connection between 2 computer systems can make sharing easier by using a LAN connection. You can quickly move your GB of data files such as documents, music, and media from one computer to another.

Not only that, by connecting two computers via LAN, you can also make your computer play multiplayer games on it. All you need to do is connect two computers, connect to a LAN, host a multiplayer game, and play on.

In this tutorial I will show you how to set up a LAN connection between two computers without a modem or router, you just need a single crossover ethernet cable and that's it.

If you want to connect your PCs via a modem or router device, I'll help with that too.

So let's see how to create a LAN connection 

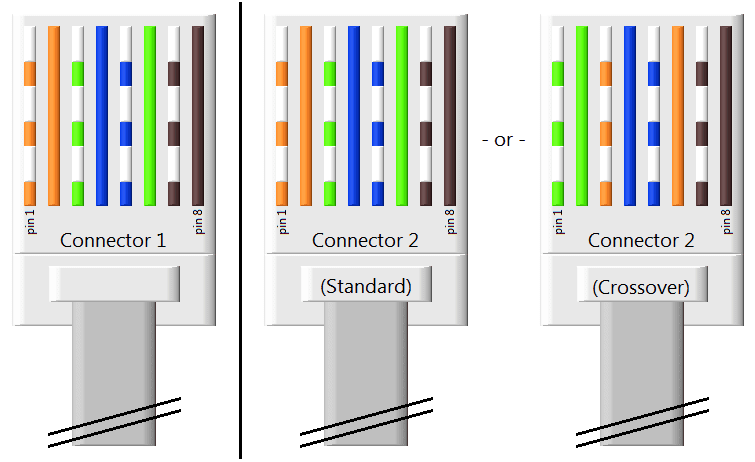
The first thing to make sure is that you have a crossover cable in hand to connect to two computers, as crossover and straight cables both look the same but function differently.

To connect two different network devices we mainly need to use a straight ethernet cable and to connect two of the same devices we need to use a crossover ethernet cable.

So make sure you have a crossover cable as this is the only way to connect two computers without a modem or switch to a modem.

This is what the internal color coding of the two cables looks like:


If you need to connect two computers with a single cable and don't have a crossover cable by your side, you can check the links below to buy a new one yourself.

In case you have an additional straight cable for your network, you can also use a straight-to-crossover converter adapter to convert your straight cable into the crossover.


In case if you need to connect more than two computers then make sure you do connect every computer with a straight LAN Wire to the local Modem, Router, Switch or Hub.


After you've gathered everything, now is the time to see how things work;


Step 1 - Create a Physical Connection

Now the first thing you need to do is connect each end of your LAN cable to both Ethernet ports on your computer to connect both computers together. If you're using a modem or router switch, make sure everything is connected properly.

And if you're trying to share things like transferring some files from your laptop to another laptop, you can also use your laptop's wifi to share your files wirelessly. To do this, both WIFI enabled devices need to connect to a WIFI router and the rest of the whole process is the same as for others.


Step 2 - LAN connection setting

After you've connected everything, you'll need to set up an IP address on both computers so that your computer can identify the connection. All you have to do is follow the same procedure on both computers or maybe laptops.

  • Open your Windows Control Panel, or you can search for “Network and Sharing Center” in the Start Menu.
  • Select the Network and Sharing Center option.
  • From the left sidebar, click on “Change Adapter Settings” option.

  • Öffnen Sie danach Ihre "Local Area Connection" oder ich sage die Eigenschaften des Ethernet-Adapters.

  • Now select the option “Internet Protocol Version 4 (TCP / IPv4)” and then click the “Properties” button.

  • Now when you see the Internet Protocol Version 4 (TCP / IPv4) Properties window. Enter the IP address manually as shown in the picture below and click on the "OK" button after entering it.

This IP address given in the picture only works if you have connected both computers with a crossover cable.

If you have a modem or WIFI router you will need to add the gateway IP as well. In this case your IP should look like this:


Step 3 - change default sharing settings

After you have entered the IP address on both computers, you must now change the sharing settings of your computers in order to allow access rights for another computer.

To do this, you must first go back to the settings page of the Network and Sharing Center of your Windows and then select the "Advanced Sharing Settings" option to view all the settings for your computer's network sharing.

After the Sharing Settings window opens, you'll need to change your network settings to the following options as listed below:
  • Turn on network discovery
  • Turn on file and printer sharing
  • Allow Windows to manage homegroup connection (recommended)
  • Turn on sharing so anyone with network access can read and write files in the public folders
  • Use 128-bit encryption to help protect files sharing connections (recommended)
  • Turn off password protected sharing
Make these changes in all network profiles;


Step 4 - Change the default settings for workgroups

With this setting, you can create the same workgroup for both computers to start sharing by joining them both in the same workgroup. The workgroup settings must be the same on both computers, but the computer name should be different to identify both.

  • First, you need to press Windows + Pause Break Key on your keyboard to open your system's properties window. Then click “Change Setting” under the Workgroup Settings category, as shown in the image below.

  • Now you need to hit the Change button in System Properties and then you will be able to see the other options for changing the name of your computer. So first click the “Change” button, then type “WORKGROUP” into the “Workgroup:” options and then click “OK”. After that, you'll need to repeat the same thing on your other computer that you want to connect to (or possibly all of the computers on your LAN sharing computers). And so your computers can communicate with each other by working on the same LAN workgroup;

  • Then click on "Network ID" and carry out this manual setting as shown in the figure below:

  • Then click Finish and restart both computers.

Step 5- Finally turn on drive sharing

Now you can see your two computers in your Windows network location and to share your drive over the network all you have to do is enable drive sharing by making some changes to the properties of that drive.

Here is a list of a few steps you can take to enable drive sharing on your computer or laptop:
  • Right click on your drive and select Properties.
  • Then, select “Sharing”.
  • Then, click on “Advanced Sharing”.
  • Then, tick the “Share this folder”.
  • Then, click on “Permissions”.
  • Then, tick on “Full control”.
  • Then, click on “OK”.
  • At last, click on “OK” again and that’s it.

If you have a problem with your local area network (LAN), your computer cannot open the shared folder, files, and drive on the network or ask for permission.

In this case, you don't have to worry because with the help of my further tutorial I will show you how to give your computer permission to read and write the files and folders on the shared drive on the network

Tags

Newsletter Signup

Sed ut perspiciatis unde omnis iste natus error sit voluptatem accusantium doloremque.

Post a Comment